Preparation
When you first receive your veneer inspect it thoroughly for satisfaction of grade and quality prior to lamination. Next it’s very important to allow your veneer to acclimate prior to use. This is done by laying the veneer flat on a surface and allowing it to “relax” in your environment for a minimum of 48 hours up to 4 days. It may be necessary to apply some weight on the ends of the sheet to help retain its flatness during this period. The ideal environment for this process is between 30% and 55% relative humidity and temperature levels between 55 to 85 degrees F. It is also important to allow your substrate material to acclimate in the same conditions for the same amount of time as the veneer. This will ensure that materials will be relatively equal in terms of relative moisture and temperature.
Tools and Supplies
Before starting your veneering project you’ll want to gather some basic tools and supplies. You will need 120 grit sandpaper, tack cloth, denatured alcohol, a sharp utility or exacto knife and a veneer scraper. Veneer scrapers can be purchased commercially and typically consist of a wooden handle and a stiff blade of polycarbonate or lexan about 4” wide. You can also make one by using a piece of hardwood approximately 4” wide by 12 to 16” in length. Make sure one end is cut nice and straight and use sandpaper to gently ease the corners and edge to eliminate any sharp lines. If you want you can also contour the upper portion of the handle to create a comfortable grip. With this smoothing blade you will generate excellent leverage and good pressure on the surface. We don’t advocate the use of any type of J-roller for veneer application. You will not generate enough pressure with any type of J-roller.
Surface Preparation
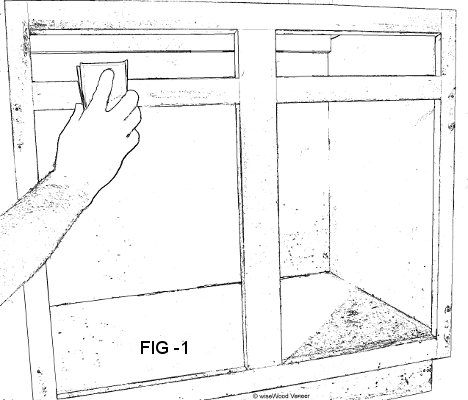
Your substrate, or the surface you are going to laminate, needs to be prepped prior to veneering with PSA veneer. For finished surfaces you will need to scuff sand the entire surface with a medium (120 grit) sandpaper. (FIG – 1) After sanding remove all sanding dust and residue with tack cloth and wipe the surface clean with denatured alcohol. If you plan to veneer on an unfinished wood surface or plywood it is recommended that you first seal the surface with a coat of varnish, shellac or polyurethane finish. Allow the finish ample drying time, usually 24 hours, and then continue on with the veneer application.
Veneer Application
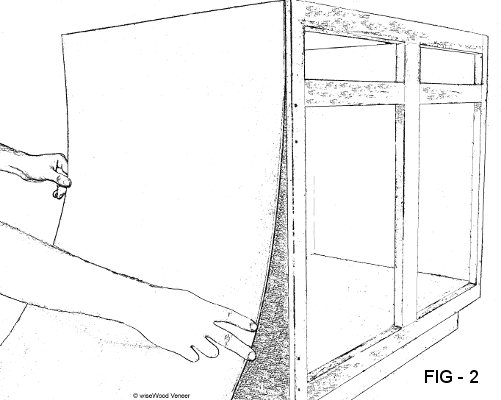
The first step to take before applying your veneer is to cut it to the approximate size of your work surface. Cut it to a slightly larger dimension than your actual surface area to allow a slight margin of error when you are placing the veneer permanently. You can then fit the veneer to the surface prior to removing the release paper from the back and exposing the glue. (FIG – 2) When you are satisfied with your fit you can now remove the release paper from the back of the veneer. Using a center line method (aligning a center mark on the veneer and substrate) place the veneer to make contact in the center first then begin smoothing by hand from the center out toward the edge. On larger surfaces you may want to lay down some separator strips or dowels to prevent the veneer from making contact until you are properly positioned. Again, start in the center and begin removing the strips from the center out applying pressure as you work outward.

Now that the veneer is firmly affixed apply pressure with a veneer scraper tool from the center outward in the same direction as the grain. (FIG – 3) Go over the entire surface twice to ensure a good bond. Inspect for any loose or bubbled areas by looking across the surface in good lighting. If there appears to be any bubbles or loose spots then go back over them with the scraping tool again. In some instances a warm iron set on a medium setting will also help set these loose spots. After applying heat to the area for a few seconds go over them with your scraper.
Trimming the Veneer
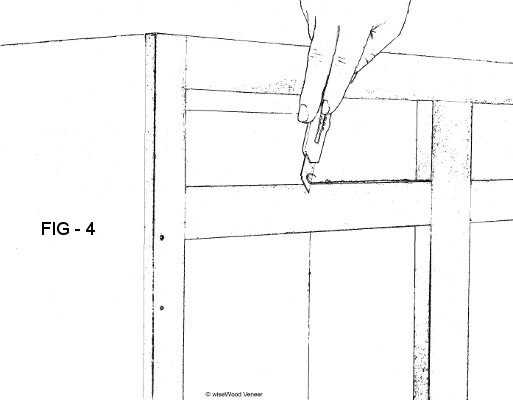
Now you are ready to trim your veneer to its finished dimension. Using a sharp utility knife or razor knife, cut the veneer back to the edge of the finished workpiece. It’s best to score these cuts a few times before cutting completely through the veneer to avoid wood fiber tear out or chipped edges. (FIG – 4) After you’re done trimming take a fine sandpaper and lightly sand or feather the edges and corners to prevent a snagging hazard. Veneer panels can also be trimmed with a powered laminate trimmer. If you are going to use this type of tool wait 24 hours before trimming to allow the glue bond to strengthen.
Finishing
It is recommended that you wait 24 hours before finishing your veneer. It is necessary to properly sand the veneer to achieve the best results. A typical sanding progression starting with 120 grit paper, then 150 grit and ending with 180 grit is usually adequate. The preferred stains and finishes for veneer products are oil and solvent based. Water base stains and finishes can be used but should be done on a test piece first to gauge reactions with the veneer. It’s important to remember that moisture causes wood to expand. If there are any flaws or weaknesses in your glue line this expansion could cause delamination or bubbled veneer. No matter what type of stain or finish you use it should be used sparingly and not allowed to sit on the surface too long. It’s always preferable to use multiple light coats of stain or finish instead of heavy wet coats. Never saturate a veneered surface with stain or finish or allow it to sit or pool on the surface. Always wipe excess immediately.
Want to print the application instructions? Download a printable PDF here.